Sumo Deadlifts Are The Devil!! …Right?

Today’s post is brought to you be the letters A and J, as in AJ Loreto. AJ trains out of Just Lift Inc., in Fort Lauderdale, Florida. His best competition lifts (all USAPL) include a 240kg squat, 150kg bench, 297.5kg DL, and 687.5kg total at 90kg body weight. He also has a boat, and runs a sweet t-shirt company. So read what he has to say, and learn from one of the top raw lifters in the country…that has a boat. – Jacob


The sumo deadlift. Competition legal for powerlifters, but hated worse than carbs in a Crossfit gym. Why do sumo pulls receive so much hate? It seems everyone’s got a hard-on for deadlifts nowadays – probably because you can stack some plates on the bar, pick it up, and feel like a bad ass. Crossfit, Strongman, Powerlifters, Bodybuilders; everyone can use them, and move a lot of weight. Feels Good Man. Now, I suspect sumo is disliked because it APPEARS you can be able to move even more weight compared to conventional, and well, haters gonna hate. So how many people in the 70sBig community have tried to pull sumo? Why not get out of your typical routine and give a barbell a tug with your legs spread wide? I bet you’d be surprised at what your strength is like going from conventional to sumo.

Why did I start caring about sumo? I was training on an afternoon with friends who dared me to sumo in a typical pissing match that occurs training hungover on Saturdays (editors note: Yessssssssss). It turns out I managed almost 90% of my conventional best for a double. This was pretty good motivation to give sumo a real go. Anything to increase my powerlifting total is a good thing, and if I get bigger and stronger in the process, I would probably like that as well.

To begin incorporating sumo, oddly enough, I maintained my conventional pulling as prescribed by the program I was running at the time (a modified 5/3/1). To add in the sumo, I began pulling each warm up weight both sumo and conventional. Then, at each work weight I would tug a single at each weight sumo. By doing only a single I was not changing the volume of my workout significantly. After 1 wave (phase, cycle, whatever) of this (4 weeks of training), I switched the movements. I pulled a single conventional and the prescribed reps sumo. Again, the intention was to keep my volume similar. As it turns out, I was smashing the shit out of my rep maxes sumo (nearly twice as many reps as I could hit conventional at a given weight but with consistent small increases in work weight – the changes in volume after the switch were not extreme). I ran this programming for several waves and believe it was effective and getting my form in order and increasing my strength.

Initially, pulling singles sumo helped develop the ‘groove’ for sumo and helped stretch out my hips a significant amount. Sumo requires, just like the squat, for you to keep your knees tracking out over the toes. Without enough flexibility to keep your knees out, many people will complain about knee pain pulling sumo. Maintaining enough ‘knees out’ will also work to get your glutes involved and is paramount to a good sumo pull. Of course you can consult your favorite coaches for advice on knee and toe placement, but I would bet that by and large most coaches would recommend knees and toes in a line, and pointed out.


Knees Out = Good

Knees caving in = pain


Because of the change in relative angles of your body parts, when pulling sumo, the back of the trainee will tend to be more upright than a conventional pull.

Conversely, the femurs will be more horizontal and the knee angle more acute. Because of the changes in the joint angles for the lifter, most will note that their back is not the limiting factor in the pull, but rather the legs and or hips will be the weakest muscles involved. What does this mean for you? If you suspect your back is weak-sauce when pulling, why not try sumo to grab a few extra pounds in the ego bank? If your back is as thick as thieves, maybe your hips and legs are lame and sumo can get them up to par with your upper body (why you no train legs bro? why?). In any case, developing strong hips at the bottom of a sumo pull should carry over nicely into a great number of lifts: your squat, conventional deadlift and even stone lifting.


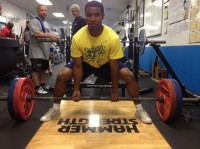
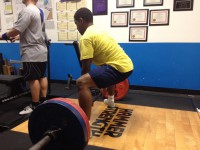
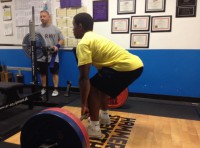
Sumo: Note the vertical torso and knee angle

Conventional: Note the more horizontal torso and larger knee angle


Stone lifting is an item that I personally have not read much (anything) about. I learned to pick up stones in a garage where my friend told me to ‘pick it up.’ No matter how one is coached (or not coached) in stones, one thing WILL happen, and that is the lifter will straddle the rock in some capacity. The spreading of your feet to the outside of the stone will put your legs outside of your conventional deadlift stance (unless you’re some weirdo who hates Vince Anello and has their feet super wide and grips the bar even wider). Granted, your foot width might not be as wide as a sumo stance when handling stones, but the idea still remains: you’re grabbing an object off the floor, using plenty of hip and hamstring, and trying to push your chest up off the floor. Attempting to keep your stance narrow and the stone in front of the feet will not be an easy task, if it is possible at all. The stones are generally large enough in diameter that even if you had the strength, you physically would not be able to balance with your feet behind the stone (imagine picking up a barbell greater than your body weight that is 6+ inches in front of your toes). So spreading your legs and pulling with similar joint angles to stones will probably make sumo a tasty movement for strongmen.

For me and some teammates, I have found that my 1 rep max is incredibly close for both versions of the deadlift. Interestingly, for a given percentage of 1RM, I have noticed many lifters will hit more reps sumo. This has been my personal observation, and I’d encourage you to see how your numbers pan out. Training with a higher percentage of 1RM in a given rep range, or using higher reps at a given percentage of 1RM, may prove to be helpful in your training. Either of these will increase working volume and, if recovered from correctly, should increase ones strength. Increasing volume over time is a staple to most (if not all) training philosophies (when considering a consistent, long, multi-cycle period of time – not a single training cycle). With this in mind, if the overreach in volume is not too great to prevent adequate recovery, switching to sumo and achieving more reps or using a higher percentage should be a benefit to your training.

Initially, when training sumo the differential in reps can be deceiving and you might think that your 1RM will be significantly different. Therefore, it will be worth your while to hit some heavy singles in the gym before you hit the platform and end up making a bad attempt call. Most trainees will find properly performed sumo attempts to be slow off the floor, but fast towards the lockout of the repetition. With this in mind, if your attempt is too heavy, the bar will be glued to the floor, whereas a conventional pull will break and might wind up stalling around the knees.

I hope you give sumo a go at some point or another. I know it’s made me a more well rounded lifter, and I believe it will add to your strength in other movements, from squats to stones (note: I really believe it is huge for stones) and even your conventional deadlift. As always, Implement changes carefully and track your progress! And stop hating on sumo, fool.

 

AC Discusses the Press

You all know and love AC. For the next few weeks, we’ll be posting some of his coaching articles on the individual lifts. In this first installment, AC discusses the Press, a lift he’s pretty dece at. He’s hit 285 for a single, and 260×4…at under 220lbs bodyweight. So, you know, maybe he kinda knows what he’s talking about, and stuff. I heard he also likes Batman. – Jacob


We’re going to talk about the Press. Soon, I’ll also talk about the entire process of Squatting and Benching. Yes I capitalized those words, because fuck you, that’s why. The first thing we talk about when we discuss the Press is grip. When most people Press their grip is usually way too wide. The forearm should be perpendicular to the bar. That’s 90 degrees. Not angled in and NOT angled out. Better external rotation can be achieved with a perpendicular grip. With that said, just because you are gripping it where you are supposed to doesn’t mean that external rotation magically happens. Justin talks about this HERE. That should give you a visual of what to do with your grip and your elbows. You should also have an erection by now as well. It’s hard to explain the grip via writing so just watch the video in the link I have provided.

Moving on, the elbows have to be cued. Some of you have your own cues. I just say to myself “Elbows in” or “Elbows.” Remember – if you know the meaning behind the cue you can shorten it to one word. If your cue is “Anal,” but you know what that means (elbows externally rotated), then you can yell “Anal!” to yourself all day. With a compact wrist and the elbows in, the drive from chest/chin (depending on anatomy) will be much faster and easier. That’s assuming you haven’t been Pressing with internally rotated elbows. Remember that you can get strong doing it the wrong way, but you can get even stronger doing it correctly. After all, you want to be able to break backs, don’t you?

If only Batman knew how this was gonna turn out.

Before you even begin to Press, you have to have a slight lean at the hips. This is NOT over-extension of the spine. Your whole body leans back. The easiest way for me to describe this is that it’s almost like stretching your hip flexors. Keeping your back in extension, you lean your hips forward. This obviously happens at the beginning. This sets the bar up for a vertical path with nothing in its way. Your huge dome and chin no longer risk getting hit. This lean is also important for something that happens later in the lift. So, as you are pressing the bar, you also want to keep it as tight to your face as possible. This is achieved by aiming for your nose. A nice cue to say is “Nose.” The bar gets pressed back in a vertical fashion instead of out in front of you, which would be bad news bears. Once the bar starts to clear the face/forehead, the next thing you are going to do is “Punch” your body “Under” the bar. At this point you are no longer leaning and you are physically driving yourself under the bar. This will get rid of the lever arm between the bar and your shoulder. From there you are just pressing it out for the last few inches.

Now we are at the top of the press. When you are at the top you should continue to “Reach” the entire time. This little reach/shrug causes upward rotation of the scapula. This little movement clears the shoulder up for any impingement that might occur. This is also when the breathing happens. First, there is a big breath for the first rep when you take it out of the rack. Then, when you have completed a rep, another fast breath occurs before you lower the bar. This might take a few days to get used. Consider the bottom of the Press like the bottom of the Squat – you don’t want to re-breath when you are rebounding. At the top, it is a quick exhale-inhale to regain whatever air you have lost during the rep.

Now for the “Rebound.” The rebound is best described as bouncing your triceps off of your armpits. This is very similar to the reflex that happens at the bottom of the squat. For some of you this may get tricky. If you remember all the leaning and shit you did before, you now have to reverse it on the way down so you are set-up again for the next rep, just like you would on a Deadlift.

There is a quick how-to guide to Press. The easiest way to learn is have a coach with you that knows what he/she is doing. I hope this can be of some help to those of you that wanted this write up. I can’t promise that you will Press as much weight as you want to, but with patience and perseverance you can conquer all of your goals. Everyone is different. Some people are stronger than others. Hell – I fucking hate tall people because I wish I was taller. So remember to play the hand you are dealt.

AC pressing 275 and 285 for singles. No big deal.

PR Friday, 14 DEC

PR Friday: Post your training updates and PR’s to the comments.

Weekly Recap: Addressing Spinal Hyper Mobility, Quality > Quantity, Just Because You Can,  and Jacob’s Chili.

I’ve been debating doing Q&As on Fridays — thoughts? They don’t seem to get much of a response. That being said, go ahead and post questions to comments.

I made a video to piggy back off of the post on Monday about spinal hyper mobility. The post was about a Mobility WOD video that stresses the importance of external hip rotation when pulling to engage musculature around the hips. The video I made explains how stance width will effect the ability to externally rotate along with some other tidbits.

And to give you some other stuff to chew on over the weekend, here’s an awesome video with Swedish strongman Magnus Samuelsson. It starts with an emphasis on his arm training, but gets into some other stuff. I thought it was interesting because of how the ‘online training community’ shuns arm training with cited reasons of “vanity” or “functionality”. Well, strong arms serve a practical purpose instead of just looking massive, and strengthening them is vital in strongman. It’s a good lesson to take from strongman training: train your entire body and do not neglect certain body parts.

Addressing Spinal Hyper Mobility

Usually Monday’s are about a female training topic. Today’s applies to both men and women with hypermobility, particularly with spinal position. You women will have to let me know what you want to hear about, because a year of female topics has left me out of ideas. 


We spend so much time thinking about how to improve mobility and flexibility with tight, inflexible lifters that it’s easy to forget hypermobile trainees. While there are a few hypermobile guys, it mostly applies to women. The primary area or hypermobile concern is in the spine via over extension.

The above MobilityWOD video shows Kelly Starrett working with Jenny LaBaw, a CrossFit Games competitor. Jenny has a bad habit of over extending her spine during lifting (particularly during squatting and pulling movements). This not only leads to undue stress on the spine, but it also facilitates poor shoulder and neck positioning. The over extension can be addressed by cuing trunk stability — something that makes the person clamp down their lower abs — yet it the trunk would still round under heavy loads and only cuing the abdomen would leave out necessary hip musculature that can fix the problem.

In the video, Kelly states that Jenny is “hanging off of her hamstrings”. In other words, her hip is flexed (meaning the distance between the front of her trunk and her thigh has decreased) while standing, and her hamstrings are anchoring her trunk from falling over. The problem, as Kelly says, is that she has not effectively engaged the rest of her hip musculature — namely the gluteals and the rest of the external rotators. By activating this musculature, it more evenly distributes the force across those muscles to allow their involvement in the movement or to stabilize it. This concept is important in lifting because it takes a movement from “moving the bar from point A to B” to something that properly engages and works all of the musculature to produce more force safely. It’s more efficient, safer, and garners better performance (by either allowing more reps with light weight or applying more force with heavy weights).

Kelly cues Jenny to produce torque on her hip by actively pushing her knees out. However, instead of thinking about this as just moving the knees out, think about the knees moving out because the femur (thigh bone) rotates laterally (towards the outside). This produces the “torque at the hip” that Kelly frequently alludes to, but it helps contract and engage all of the musculature in pulling or squatting motions. I’ve also done several posts and videos to help explain this concept (“Hip Torque”, Toe Angle, and Squatting; Should I Point My Toes Forward?; and Public Service Announcement: Toe Angle) , and the same “torque to engage musculature” applies to pressing (The Lats While Benching and 3 Press Fixes).

Lastly, notice how Kelly coaches Jenny through a couple of movement drills that work on engaging this musculature through hip flexion in an abbreviated RDL and squat. He greases her through that beginning range of motion — right when the hip starts to flex and the spine accumulates load. These “drills” don’t need to be a primary focus, but a trainee could consider them a primer before warming up the large scale movement. They could also be implemented in assistance exercises; the RDL is an effective exercise for most athletes and it is only improved by emphasizing tension at the hips.

Whether you’re a coach or a trainee, you now know that when spinal over extension occurs, it can be eradicated by providing tension and torque in the rest of the hip area. And if you’re into Jenny in the video above, you’ll probably like this video too:

Shoulder Health – Part 2

In “Shoulder Health – Part 1” I reviewed the musculature surrounding the shoulder and body posture. Posture is important because it dictates shoulder mechanics, specifically  internal and external rotation.

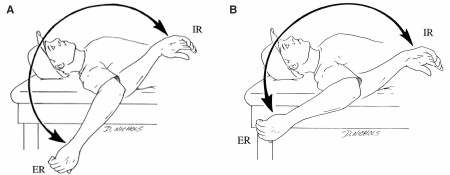
IR=internal rotation and ER=external rotation

Shoulder rotation is easy to decipher: if the anterior aspect (front) of the humerus (upper arm bone) rotates medial (towards the middle of the body), that is internal rotation. If the anterior aspect rotates laterally (away from the middle of the body), then that is external rotation. This holds true regardless if the elbow is flexed or extended, or if the shoulder is flexed, extended, abducted, etc. For example, put your arms overhead. Turn the front of your biceps (which sit on the anterior aspect of the humerus) towards your ears; this is internal rotation. Now turn them back and to the outside, and this is external rotation. Coincidentally this external shoulder rotation while in flexion is what the training community refers to as the “overhead position” — which is the position in which a person can bear a load safely (i.e. with good mechanics).

But it’s important to understand why external rotation facilitates a good overhead position and is the basis for shoulder stability in all shoulder movement. There are several reasons that are intimately related: shoulder positioning, muscular involvement, and force distribution (or mechanics).

Shoulder Positioning

Simply put, external rotation keeps “the shoulder” back and down whereas internal rotation moves it forward. “The shoulder” is actually the articulation of the humerus into the glenoid fossa; this junction is collectively called the “glenohumeral joint”. This bony articulation will be the focal point when we observe if the shoulder is “back” or “forward”. Keep in mind that the glenoid is a part of the scapula, or shoulder blade, and scapular movement (up, down, in, or out) can influence shoulder position.

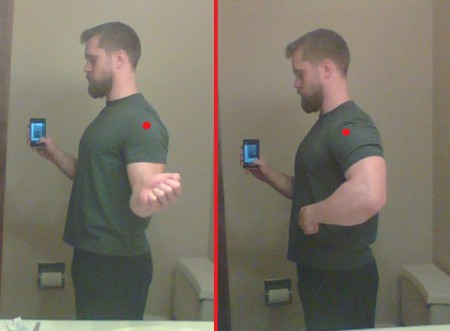
External rotation on the left, internal rotation on the right. Note the change in position of the glenohumeral joint. (I took the flannel off for clarity)

In the above picture, the shoulder is in neutral position (relative to anatomical position), and the elbow is flexed. But you can see this same glenohumeral movement even in extension or flexion (i.e. if your arms are overhead for shoulder flexion, you can see the glenohumeral joint move if you completely internally rotate compared to where they were in complete external rotation).

Click to see a larger image in more detail

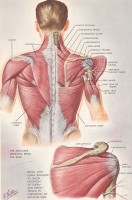
This forward transition in internal rotation completely changes how the shoulder receives and distributes force (which we’ll talk about in the next two sections). But it also has an effect on thoracic spine positioning. The scapula is primarily held in place by the trapezius muscles and the rhomboids (see image right). So if internal rotation occurs, it pulls the scapula laterally to pull on those muscles that anchor the scapula. The result is that if the shoulder is in severe internal rotation, the thoracic spine cannot achieve quality extension. 


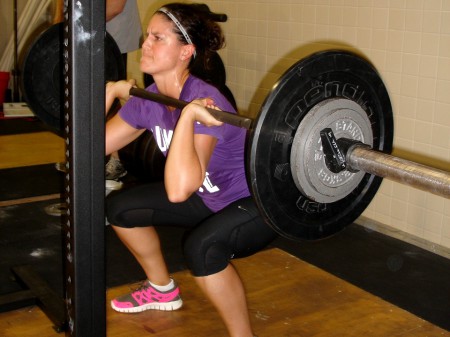
This is easily seen in poor front squat or clean mechanics in CrossFit or Olympic Weightlifting. When the trainee flares their elbows out to the side (internally rotates the shoulders), their chest inevitably falls to round the upper back and usually also causes the lumbar spine to round (which may be directly caused by the thoracic spine or caused by the hip impingement from not shoving the knees out to externally rotate the hip). This severely inhibits good front squat mechanics and results in the trainee not training their musculature properly (it doesn’t work the upper back muscles, it shifts the center of mass forward, puts most of the weight and force application into the knees, and removes the gluteals and even the hamstring involvement, and undoubtedly contributes to “The CrossFit Quads“). The cure for this is to cue the elbows “up and in”. “Up” means shoulder flexion and “in” means external rotation in the front rack. This cue should be distributed en masse to all CF facilities.

Hard to find a good example, but flared elbows means internal rotation means flexed thoracic spine means ineffective exercise.


Glenohumeral positioning has an effect on thoracic extension. Furthermore, having limited mobility in the shoulder is compensated by the thoracic spine. Let’s assume a person that has a poor overhead position. They cannot achieve full shoulder flexion (straight up and down) much less do it with external rotation. Their straight arm is five degrees forward of vertical (example). In order to put the bar “overhead”, they will compensate by hyper extending their thoracic/lumbar junction by 5 degrees (see image right). This is bad for several reasons: 1) places undue stress on the thoracic/lumbar junction or the lumbar/sacral junction; 2) it caters to existing shoulder or hip immobility and makes it worse; 3) it does not allow the trunk muscles to properly stabilize or develop properly which 4) results in a lack of progress and strength development in the press and 5) probably leads to some sort of injury or irritation, whether it be in the shoulders or cervical/thoracic/lumbar spine.

Now you should have a good understanding that internal rotation and/or lack of shoulder mobility can influence the positioning of the glenohumeral joint, but also the spine when lifting.

Muscular Involvement

Look at the image of the posterior shoulder anatomy again. Review the video from part one. We already know that the shoulder is the articulation of the humerus with the scapula. We know that rotation of the shoulder can alter the positioning of this joint. and we also know that since the scapula sits on the back of the rib cage, most of the musculature holding it in place is on the posterior side. There are some muscles that attach on the anterior aspect of the shoulder, but most of the important muscles are posterior. Also keep in mind that there is not a lot of structural stability in this joint — the muscles that attach around the glenoid and the head of the humerus hold everything in place. When you make a fist, your have some tissue surrounding a lot of bones. Your shoulder is pretty much two bones touching with a lot of muscles wrapped around it.

I point the anatomy out, because how these muscles are used matters. Previously mentioned muscles like the traps or rhomboids will effect scapular positioning, but the health of the shoulder joint lies with what people call “the rotator cuff” muscles: the supraspinatus, infraspinatus, teres minor, and subscapularis. Other muscles like the teres major and lattisimus dorso play vital roles in shoulder mechanics.

The point isn’t to learn all of these muscles, but to the general role that shoulder musculature plays, especially regarding lifting. Some muscles externally rotate while others internally rotate. We already know that external shoulder rotation is efficient and desirable, but the muscle action supports this.

Without good coaching, a trainee will perform a press, bench press, or push-up however they can. They’ll utilize existing musculature to try and get the job done. But internally rotating the shoulders leaves out a lot of musculature, and thus stability in the shoulder. By externally rotating, all of the muscles that externally rotate will contract and all of the muscles that internally rotate will lengthen with tension. This last part is important, because in a well excecuted bench press the internal rotators will be taut and help stabilize the joint. In the same way that the hamstrings lengthen with tension during a squat, the internal rotators will be stretched, yet apply lots of tension to play their role in holding the shoulder in place.

On top of this added stability, the proper external rotation in this bench press also allows the distribution of force into other muscles (like the pecs and triceps) without exposing an area or structure to undue injurious stress. In other words, by using external rotation in pressing and pulling movements, more musculature is being used properly, which helps a trainee get stronger. This is also why people who internally rotate (and flare their elbows) will eventually experience pain or injuries. For example, conventional powerlifting lore says that pressing overhead is bad for the shoulders — and they are right! If you press overhead with crappy mechanics, you should expect to destroy your shoulders.

Force Distribution

I use the term “force distribution” to refer to what muscles are being utilized in a given movement. By lifting with quality shoulder positioning and mechanics, the muscles around the shoulder work in symphony to apply force. Proper technique yields comprehensive muscular action and development. I use the phrase “even force distribution” to mean that one muscle or muscle grouping is not solely relied on to complete a movement, and instead it is distributed evenly across all of the muscles that are supposed to be used.

For example, above I critiqued the poor CrossFit girl’s front squat technique (she needs lifting shoes too). By flaring her elbows on her front rack she drops her chest to a) round her upper back and b) drop the bar forward on her shoulders. When the bar shifts forward, it moves her overall center of mass forward, and then her knees and quads receive the brunt of the responsibility to stand up with the weight. In a quality clean or front squat, the load will stay centered to allow all of the muscles of the thighs and hips to apply force. In this case all of the gluteals, the hamstrings, and her lateral quadriceps are not contributing to the movement. Whether she’s doing the front squat for strength or conditioning, her coach is letting her not train her musculature as efficiently as she could. A crime, really.

Back to shoulder anatomy. If internal rotation occurs on pressing movements, then force is unevenly distributed. Specifically, the acromioclavicular joint (where the tip of the shoulder meets the clavicle) receives a lot of stress. This is also the same region as the proximal biceps tendon and the insertion of the supraspinatus. This means that these two tendons (biceps and supraspinatus) are often irritated, strained, and later frayed or torn when bad mechanics are used chronically.

In order to have even distribution across the shoulder muscles we must have good shoulder positioning, and this is done by using proper external rotation with respect to the exercise being performed. Good position allows for the proper muscles to act not only in the way they evolved to act, but in symphony with each other (this is an important point that is the reason that compound, multi-joint exercises are optimal for strength training and rehab). Since the positioning and musculature are correct, the force application is evenly distributed so that the muscles do their job, keep the joint safe, and get stronger.

The problem is that all of this is either inhibited or not possible with crappy shoulder mobility. And that is the topic in Part 3.