Coaching the Sumo Deadlift

We’ve had some talk lately about sumo deadlifts. Some of you are still of the mindset that “only conventional deads are ‘real’!” That’s fine. When you finally come around and try these, the rest of us will already be well-versed with them.

Our model today is one of my Vintage Strong lifters, RoryT. He’s a 181-198 powerlifter who is built to squat and bench, but not to pull. Before I took over his training, he had frustratingly beat his dead against the 450lb brick wall for about a year or so. We transitioned him to sumo pulling about a year ago (along with a wide-stanced squat to compliment it) and he ended up pulling 500lbs for the first time as my birthday present – along with recently getting his squat to 520×2. At our gym Push/Pull meet June 1st, I expect him to pull around 525 or so, which will be a nice PR for him. He should get 550 by November, his next meet.

The first thing most people screw up on any kind of deadlifts is the width of their grip. Your arms need to hang straight down from your shoulders. Any angle in, or more likely, out, makes you do more work – it sets you up in a more awkward starting position and makes the distance you have to pull longer. This is true for conventional pullers, and a very common mistake, but is even more troublesome with sumo deads, because if you grip the bar too wide, your hands get even more in the way of the movement than normal.

This is what we call "pulling into your dick." Avoid that, if possible. And if you do it...smile.

This is what we call “pulling into your dick.” Avoid that, if possible. And if you do it…smile.

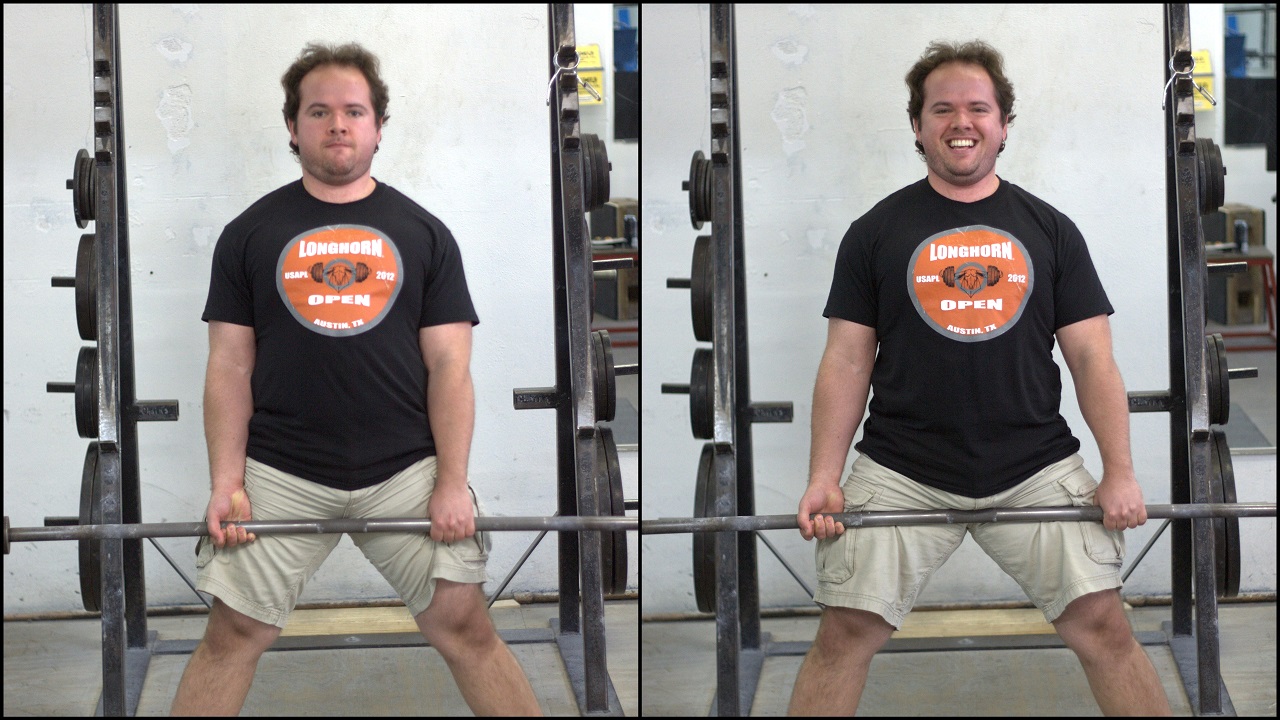
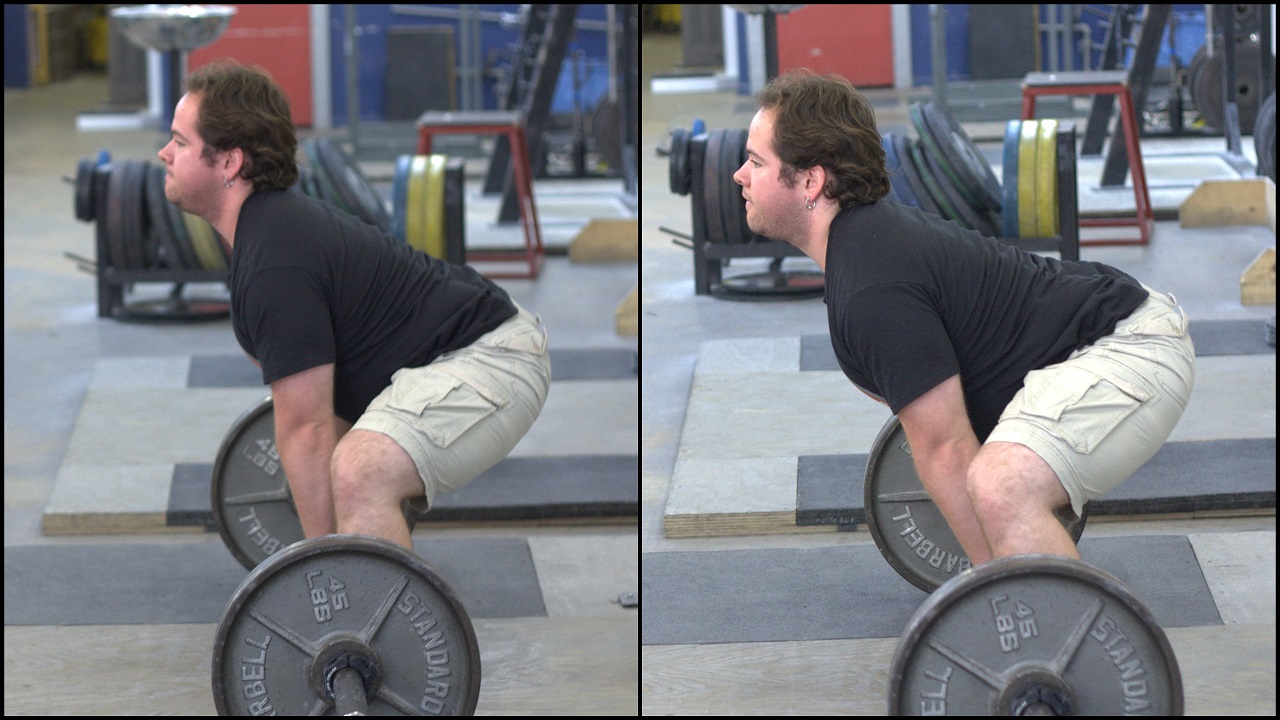
The second thing everyone needs to pay attention to is stance-width. When you first transition to sumo pulls, work your feet out to a wider stance SLOWLY, over several sessions, and stretch – a lot. Your hips will thank you. At first, getting your feet just outside of your hands will be fine. As you become mobile enough, going wider will mean a shorter stroke and a stronger lockout, at the expense of increasing the difficulty of breaking the bar off the floor. We’ll call this the “Narrow Sumo.” Don’t expect to be dramatically stronger at narrow sumo than conventional – it’s essentially going to put your levers in the same position, as you can see in the pic.

Conventional on the left, Narrow Sumo on the right. Note the similar back angle.

Conventional on the left, Narrow Sumo on the right. Note the similar back angle.

Eventually, you’ll be able to comfortably slide your feet out several more inches per side, which will allow you to shorten the ROM of the movement. We’ll call this the “Wide Sumo” because we’re brilliantly original. Wide sumo does not have to mean your feet are touching the plates, OK? It does mean that you’ll be able to have a slightly more vertical back-angle, which is a great benefit for those of you like Rory who have a relatively long torso for your height, and/or shorter arms – which is basically the perfect build to go ahead and run with sumo.

On the right is Rory's slighty wider sumo stance. Note the more advantageous back angle (admittedly, he's more arched and set up to pull, too). It's not a drastic-wide stance.

On the right is Rory’s slighty wider sumo stance (see the increased distance between his hands and shins?) Note the more advantageous back angle (admittedly, he’s more arched and set up to pull, too). It’s not a drastic-wide stance.

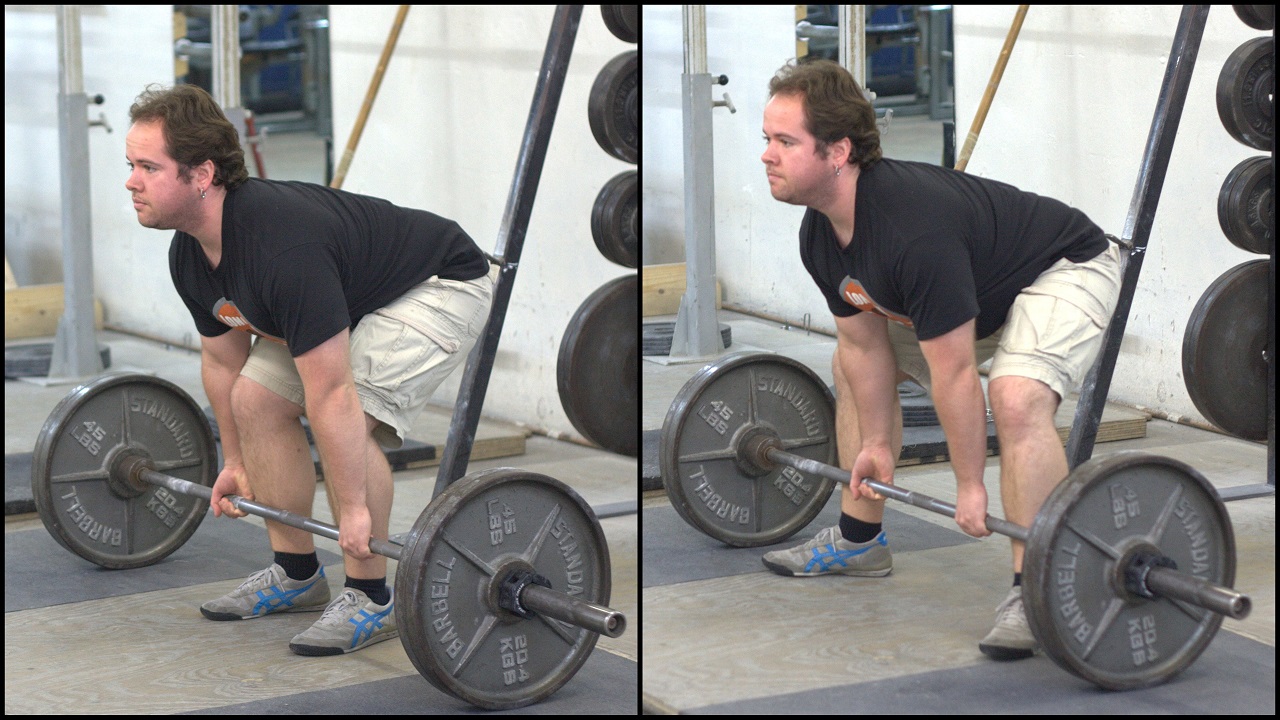
Your grip and stance width are the most basic parts of learning sumo, so once you have them correct, it’s time to set up for a pull. I’m going to tell you to get your feet UNDER the bar as Rory has done in the pics above. You are literally going to have the bar touching your shins. Most people set up too far away from the bar, and as a result, have a forward-angled-shin. The coaching cue here is “straight shins,” which is silly, because your shin can’t not be straight. It’s short for straight up and down, or vertical. Think STRAIGHT SHINS, and make them as vertical as possible.

The left is how it SHOULD look. The right is how it probably looks when you first try sumo.

The left is how it SHOULD look. The right is how it probably looks when you first try sumo. Note the angles of the shins and arms.

Get your feet under the bar and grab the bar at the appropriate width. Chances are it feels awkward as hell if you’re doing it correctly. Good. You want to get your center of mass as far behind the bar as you can without falling over. The cue here is STRAIGHT ARMS. You want to try and get your arms much more vertical than you’re probably used to. You could probably condense both of these cues and just yell “BE STRAIGHT” to your lifter, but that might raise some eyebrows at your gym and make you look like a jackass.

When you’re in the correct starting position, and you feel like you’re about to fall on your ass, it’s time to start the pull. As with the regular dead, you must set your lower back, flex your posterior chain, and get to work. It’s even more important on sumo, so get it right. Getting your lumbar flexed and solid before the pull is KEY. If you have problems locking out a sumo, you’re probably not setting your back well enough. You’ll also think “chest up,” though again, that’s not a literal cue – it simple means to get your upper back tensed as well. If your nipples are pointed at the bar, you’re gonna have a bad time.

SET YOUR BACK! Or you will die.

SET YOUR BACK! Or you will die. The left might feel easier when getting the bar off the floor, but it won’t go anywhere after that. The right will mean a smooth 3-white-light PR. Do it. 

Initiate the pull by squeezing the bar off the floor using your glutes and hams, which should be tensed as soon as you touch the bar. Carry this momentum as hard and as quickly as you can all the way to lockout. Think about shoving your hips FORWARD into the bar all the way until lockout, and don’t re-bend your knees at the top. Yes, we use the “hips!” cue. Yes, it makes us sound douchey, like a multiply gorilla. No, we don’t care. Always yell “OH YEAH!” when the hips are truly engaged. Trust me.

Another way to look at this is to think about “pulling back” on the bar. Both cues basically accomplish the same thing, but see which resonates best for you, and stick with it. Your weight should always be concentrated on your heels for a sumo pull. If you’re coming up on your toes, fix it.

A note on footwear: You should sumo pull in a flat-soled shoe. For what I hope are obvious reasons, don’t use your heeled Olympic shoes. Wrestling shoes are the best bet, but IPF-approved slippers are a $10 option if you’re cheap. I prefer to pull in socks at my gym, because it’s easy. Chucks are OK, but still have a bit of a platform and that could cost you a PR. Rory squats and pulls in the shoes pictured in the gym, but uses Titan slippers at meets.

Hopefully this helps you figure out how to sumo. Ask any questions you have below. Once you get your sumo form figured out, you should really be impressing the opposite sex. If not, I suggest you take up juggling. Of course, Rory’s probably better at that than you, too, but everyone’s gotta have an idol, right?

LAX balls are very useful to have around the gym.

LAX balls are very useful to have around the gym.

PR Friday, 10 May 2013

Earlier this week, I issued you a challenge, and said “Go talk to someone bigger and stronger than you.” So did you? I know at least a few guys have, and have already reported back to be with some pretty rad tales. I’m looking forward to hearing your stories. Hell, if you can write real, real good, have a compelling tale, and you feel like you can get 500-1000 words together about it and a picture or three, shoot me a full submission. Cya.

Mark Marotta submitted an excellent and comprehensive overview of the various big (raw) powerlifting feds. It’s a work in progress, but something we can refer to in the future as more of you guys enter meets and represent the community whilst destroying PRs. He’s already given me some more info today, so I’ll be updating that shortly.

When he’s not building an entire family of atlas stones, Mike B has been absolutely on point about answering all the questions you guys post on our facebook page, so I hope you’re thanking him properly (you can find his email address on here if you need to send nudes). This week he covers some Texas Method stuff, some conditioning, some pressing tips, and a few other things. Check it out.

I still have a few more emails full of your beautiful (?) 70sBig faces, so I’ll get to it.


Victor

victor2

Victor sent in a whole damn gallery, but I hand selected my favorites. 70sBig photobombs are ALWAYS good. That’s a dece birthday glass, too.


nick

For some reason, I’m particularly enjoying this picture from Nick. Maybe it’s because, like me, I can tell this guy’s goals at least in some way include the words “scare everyone when I walk into a room.” I feel ya, brother. “The Face” is all about contorting your stare and confusing the weak. This guy gets it. Now stop looking at me, bro.

dave


This is my boy Dave. He lives in Australia, has a sweet home gym, keeps a log over on my LiftHeavyShit forums, benches 3 hunge on the reg, and eats MULTIPLE racks of ribs at the same time. He should be famous, right? Well, now he is. You’re welcome, Dave. Also, you look pretty skinny. Might want to order a third rack next time.

Charlie


Charlie’s the guy on the left. This picture might not seem like anything special at first, but then you realize – HOLY SHIT, Charlie isn’t even LOOKING at the camera, and he’s still dropping the 70sBig face bomb all over the place. That’s a glass of straight whiskey in his hand. Not a fuck was given. Believe it.

And with that, I’m officially out of pics. If I missed yours, don’t get butthurt, just resend it, or realize it was really terrible, or over 1MB in size. I really did try and post them all and not miss any, but hey – I’m just a man, I’m not perfect. Just a big, beautiful, bearded man. That’s perfect.

Post up your PR’s and have a great weekend. And for the love of all that is holy, if you don’t at least call your Mother this Sunday and thank her excessively for all that she has put up with in your life, I will find you and burn down your freaking house.


Powerlifting Federations

I asked Mark Marotta to write a post that we could use as a reference for lifters interested in getting involved in their first powerlifting competition. I’m extremely pleased with what he put together. Ask any relevant questions below. – Jacob


One characteristic (read: problem) that distinguishes powerlifting, as a sport, from most other sports, is that there is no individual federation that is the one recognizable organization for the sport (think IWF for weightlifting, NFL for football, etc). In powerlifting there are multiple organizations that are all of comparable size and name recognition. For those interested in competing, I’m going to use this article to outline the differences between some of them so when you do decide to compete, you can pick which federation is right for you.

The most recognizable/largest federations in powerlifting, in no particular order, are the International Powerlifting Federation, The World Powerlifting Congress, and 100% RAW Powerlifting. Of course there are other, smaller federations, but they won’t be as likely to have meets in your area, and if, by chance they are the closest meet, this article will tell you all the things you need to look for in the rule book (you should read the whole thing anyways, but there are certain things to make sure you look for).

This article will, of course, only cover the raw sections of the aforementioned federations, as this site has never claimed to have enough knowledge of equipped lifting to write any advice on the subject.

1. WEIGH IN

Seeing as it’s the first thing you’ll do, it’s the first thing I’ll cover. Different federations have different “weigh in” periods, as well as different classes to weigh into. If it’s your first meet, this does not matter. Weigh yourself when you fill out your registration, pick the weight class you fit into at this time, then whatever class you weigh into at the meet, it doesn’t matter. For any meets after this, though, The weight classes are as follows:

IPF:

Men: 58kg, 66kg, 74kg, 83kg, 93kg, 105kg, 120kg, 120+kg

Women: 47kg, 52kg, 57kg, 63kg, 72kg, 84kg, 84+kg

(Editor’s Note: The USAPL, the US arm of the IPF, uses slightly different classes, which I will update here)


100% RAW:

Men: 48kg, 52kg, 56kg, 60kg, 67.5kg, 75kg, 82.5kg, 90kg, 100kg, 110kg, 125kg, 140kg, 140+kg

Women:44kg, 48kg, 52kg, 56kg, 60kg, 67.5kg, 75kg, 82.5kg, 90kg, 90+kg

WPC:

Men: 52kg, 56kg, 60kg, 67.5kg, 75kg, 82.5kg, 90kg, 100kg, 110kg, 125kg, 140kg, 140+kg

Women:44kg, 48kg, 52kg, 56kg, 60kg, 67.5kg, 75kg, 82.5kg, 90kg, 90+kg

As for weigh-in periods, the IPF has a 2 hour weigh in time, meaning no one can weigh in any more than 2 hours before the meet (or your section of it) commences (Note: Some USAPL meets will choose to hold a longer weigh-in period for NON record-setting lifters). WPC has a 24 hour weigh in, which typically means there will be multiple weigh in periods scattered across the 24 hours preceding the section (for example, 3 separate 2 hour periods to weigh in – one starting 24 hours out, one 12 hours out, and one 2 hours out). 100% RAW meets have 18 hour weigh ins with one period the evening preceding meet day and one period the morning of. There are plenty of arguments of whether or not 24 hour weigh ins are cool, but for your first meet it doesn’t really matter as long as you know when and where your weigh in is. If you don’t weigh in, you don’t lift, so just make sure you get that information and write it down on your check list for the meet (Make a checklist of things you need to have and places you need to be well in advance).


2. EQUIPMENT

Pretty much any federation you lift in, you’re going to need a one piece, one ply singlet with either the manufacturer’s logo or without one at all, a one piece, one ply t-shirt with the sleeves ending above your elbows and below your delts that is either plain or has a design that is “not offensive.” Allowance on designs isn’t going to vary federation to federation so much as it will meet to meet, so just bring a plain t-shirt. You’ll also need socks that go up to your knees for deadlifts, to the same specs as your shirt. You also can’t wear assistive underwear, they don’t usually check, but just wear normal underwear. (Note: For the love of Glob, wear whitey-tighties or a jock strap. Anything else is asking for trouble from bored judges. Females should avoid underwire bras or panties with an inseam).


2.1 Knee Sleeves:

IPF: Commercial knee sleeves as designed for medical/surgical or sports use and constructed of neoprene (no other form of rubber or similar material is acceptable) with an optional covering of cotton, polyester or medical crepe may be worn. Alternatively an elasticised traditional kneecap supporter may be worn. A combination of the two is forbidden.(Note: The IPF has a list of approved knee sleeves, will update soon)

(a) Knee sleeves must be “slip on” and not contain any form of tightening e.g. straps/draw strings/velcro tabs and the likes. Read: No Inzer Wraps.

(b) Maximum length 30 cm’s, maximum thickness 7 mm’s.

(c) Must not extend more than 15 cm’s above or 15 cm’s below the center of the knee joint.

(d) Shall not be in contact with socks or lifting suit.

100% RAW, WPC: No knee sleeves are allowed in the raw division.

2.2 Wrist Wraps:

IPF: Select from the list of approved wraps on the IPF site. Once worn, the wrap cannot be more than 10cm above, or 2cm below the center of the wrist joint, with the total wrap not exceeding 12cm.

WPC: Up to 1m in length, 8cm in width – if they have a thumb loop you cannot use it. The wrap cannot be more than 10cm above, or 2.5cm below the center of the wrist joint, with the total wrap not exceeding 12cm.

100% RAW: Up to 61cm in length, 8cm in width, if they have a thumb loop you cannot use it, with the total wrap not exceeding 12cm.

2.3 Shoes

IPF: Sports shoes, sports boots, Weightlifting shoes, Power lifting boots, or Dead lift slippers must be worn. The bottom must be flat (no projections, irregularities, or a doctoring from the standard design and no part of the underside higher than 5 cm’s). If there are loose inner soles they may not be thicker than 1cm.

WPC: Footwear more substantial than basic socks must be worn. The only restrictions to such footwear is that no metal cleats or spikes are permitted.

100% RAW: Same regulations as the IPF, with the limitation that the bottom of the shoe cannot be taller than 5cm at any point.

2.4 Belt

All of the federations have long winded explanations that are different hashings of the same thing. If you have a regular prong/lever belt, less than 10cm tall, and less than 13mm thick, with no logo or text on it other than your name, or a lifting club you’re affiliated with. With the additional limitations from IPF of:

Inside width of buckle: maximum 11 cm’s.

Outside width of buckle: maximum 13 cm’s.

Tongue loop: maximum width 5 cm’s.

Distance between end of belt and far end of tongue loop: maximum 25 cm’s.


3. THE LIFTS

3.1 SQUAT

All three of the federations follow the same set of standards for the squat, with the same commands. The crease of the hip must go below the top of the knee, the feet cannot move once the lift has commenced, you cannot double bounce, etc. The rule books of the federations are nearly word-for-word identical. The only difference is that the WPC allows lifters to squat out of a monolift (you can walk it out if you want) whereas IPF and 100% Raw use squat stands or racks.

3.2 BENCH PRESS

IPF: Commands for beginning the descent of the bar, pressing once the bar has touched the chest and become motionless, and one to rack when the bar is locked out. Suicide grip and underhand grip are not allowed. During the lift the feet must be flat on the ground.

WPC: Commands for pressing once the bar is motionless on the chest, and for racking when the bar is locked out. Suicide grip and underhand grip are both allowed. At minimum the toes must be in contact with the ground, but the feet can be placed flat on the ground if desired.

100% RAW: Commands for pressing once the bar is motionless on the chest, and for racking when the bar is locked out. Suicide grip is allowed, underhand grip is not. The feet must be flat on the ground for the duration of the lift.

The rest of the rules for the lift are consistent between the federations. The distance between the lifters hands cannot exceed 81cm, your feet cannot be in contact with the bench or it’s supports, and the bar can not be raised with an excessive tilt, or an oscillation.

3.3 DEADLIFT

The rules for the deadlift are entirely consistent between the three federations. Your feet can’t move once you start lifting, you can’t hitch, you have to control the descent of the bar, and all the standard rules for doing a deadlift. The only command is for descent, once the bar is locked out.


4. MISC.

Another difference between the federations that should be taken note of is the attempt protocol. When the attempts are put in for IPF and WPC competitions, the lifter or the handler/coach needs to sign for it. In 100% RAW, you just need to tell the officials the weight. Having competed in both WPC and IPF meets I’m gonna go ahead and say that for a beginner WPC is a lot friendlier of an environment. It’s a lot more of a relaxed setting (which has it’s pros and cons) from what I’ve seen 100% RAW is a lot more similar to WPC in that respect.

For further reference, read the rule books linked below (before you do a meet in a new fed read the entire rule book. Just fucking do it.) The record books for the feds are linked below as well.

IPF:

Rules

Records

(The American records are linked because the formatting of the world record’s on IPF’s site is completely abhorrent)

WPC:

Rules

(Word document download link)

Records

100% RAW:

Rules

Records


Now get out there and compete, dammit!


DO IT: Talk to someone bigger than you.

This week, I have a challenge for you: I want you to talk to someone bigger and stronger than you, and I want you to try and learn something from them about training, recovery, or even just being a badass. I expect a full report as part of your PR Friday post.

Yes, that's a huge bicep sticking out of the front of the gym.

Yes, that’s a huge bicep sticking out of the front of the gym.

I’m lucky enough to train at a gym full of very strong guys and gals. It’s the type of place where you’re more likely to get frustrated because all the squat racks are full (of people actually squatting, deeply) than you are going to get annoyed by typical gym douchery. It’s the type of place where people rack their weights and know each other’s PRs almost as well as they know their own. We have gym record boards and we push each other to improve on a constant basis. We also make it a point to openly discuss our training and we generally accept criticisms, and become stronger for it.

I’ve been thinking about this a lot lately, and I know many of you aren’t so lucky. Lots of folks hate their globo-gym environment, and some guys decide to just build a home gym, which is fine. But if you aren’t learning and being pushed by people who are stronger and more experienced than you, you’re leaving something on the table. Every week, I see something pretty amazing at Hyde Park, whether it’s an Olympic lifter hitting a huge snatch (heh), or a powerlifter destroying a triple body weight deadlift, or even a figure model or bodybuilder grinding through an intense (and heavy) rest-pause set. And more often than not, I watch these folks, I try to see what I can learn from them, and I ask them questions so I can better understand what they’re doing.

DaveExample: Previous gym owner Dave Goodin is a world-famous natural bodybuilder, and I see him every day at the gym training his clients (and/or himself). You bet your ass I pay attention when a 50+ year old dude is jacked beyond belief, especially when he spent the better part of his career powerlifting AND bodybuilding. I’ve heard him tell a client “You want bigger traps? Deadlift more!” After watching him use the ancient Nautilus Pullover machine, I gave it a whirl, and fell in lofe with it, to the delight of my tricep size. Just because his main sport is bodybuilding doesn’t mean I can’t learn an absolute shitload from the man.

Now, I don’t just follow the legends around like a puppy dog (I’m a naturally shy person – it took me well over a year to even strike up a conversation with Dave). I’ve also asked big benchers about their programs and favorite accessory work, and I often ask for an extra set of eyes on my own form, or my lifters’. I pay special attention to how other coaches cue their lifters, and I talk to trainers about everything from lifting to pizza and football. On the flip side, I’m also lucky enough to have established myself as a source of info and help, so I field my share of questions, spots, and form-checks as well. Brook, the gym owner, always introduces new members who might be a good fit for our powerlifting team, and every once in awhile, a new member comes in and says “Wait, are you the chili guy?” But as much as I make myself available and answer questions every day, I am still always seeking out more information, especially from those that have learned lessons the hard way.

My point is, you can always learn more. Find someone with a huge back, and ask them how they earned it (how do you think Glenn’s version of the bent-row got so popular?). Find a bodybuilder with massive triceps and watch what movements they’re performing, and understand their intensity levels. If you’re at a CrossFit box, ask one of the firebreathers about their approach to attacking their weaknesses. If there’s nobody stronger than you at your gym, well, you need to find a better gym. If you’re exclusively training at home, maybe you should consider getting a punchcard to a local black-iron place and socializing a few times a month.

It doesn’t matter if you’re already thick, solid, and tight, or if you just got Starting Strength – get out there and learn, and respect that others have paved the way to what we’re doing. Back in the days of Doug Young, before Al Gore pulled the internet out of a rainbow-colored unicorn’s ass, how do you think guys learned how to get swoll? They politely introduced themselves to behemoths, and they damn well listened to what those guys had to say. They didn’t spend 12 hours building a spreadsheet and perfecting every percentage of every lift they were going to do the next 17.3 weeks – they spent countless hours sweating their asses off to try and get to the point where they could do anything anyone else in the gym could do.

So get your ass out there and talk to someone bigger and stronger than you. You’ll be a better person because of it.


Incorporating the SlingShot Into Your Training

When I first read about the SlingShot (or SS, or Slanger, or Egoband, or MagicBenchThing), I was skeptical. I happened to be more than a little burned out on bench at the time, after one AC joint surgery and another in the impending future. I didn’t bench much for a couple years, which was bad news, considering I was already a shitty bencher. I jumped on the “Overhead Press is more manly!!” bandwagon for awhile, but eventually, realized I was only doing that to avoid benching because I sucked at it.

slingshot

I finally manned up, realizing that the only way to get better at things you suck at is to do them, regularly. So I started benching again, and making some progress when I could stay healthy (which wasn’t often). Then, about a year and a half ago, right about the same time Justin started talking about the slanger, I saw a “buy one get one half off” sale on Mark Bell’s site, and I ordered a red (Original) XXL for myself, and a small blue (Reactive) one for my lady friend.

Since then, I’ve done a lot of experimenting with incorporating the SS into both my own lifting, as well as that of other lifters that I coach. Fast forward to today, and…well, it’s no secret that me and the SlingShot get along real, real good-like. I’ve seen personal gains (especially in regards to reduced shoulder pain), and I’ve seen even better gains from my badass lifters. I now feel pretty confident suggesting the SS to other folks, not only because I’ve seen it work, but also because I like the company. Mark Bell is a breath of fresh air in the strength community – a real guy who offers up daily selfie-vids on youtube, answers people’s questions, and seems like a pretty dece guy in general. There are several other devices out there similar to the SS, but I’ll suggest that you go to howmuchyabench.net to get yours. And, in case you’re wondering – I don’t get any financial gains out of this, just the personal satisfaction that I’m helping people set new personal records on a lift that can be very difficult to improve.

If you’re not already familiar with the SS, let me describe it to you. It’s essentially a wide, stout rubber band that wraps around your arms and, once stretched over your ribcage at the bottom of a bench press, allows elastic energy to assist with the upward motion to an overloaded lockout. The greatest help is out of the hole, and the assistance curve approaches zero at the top of the movement. This means you get a lot more work holding and locking out your bench with heavy weight, with a nice help bouncing it out of the hole. This effect is similar to a bench shirt or a reverse-banded-bench, but much, much easier to setup and perform. Since most benchers are limited by tricep strength and confidence with heavy weights, this can be hugely beneficial. Better put: The SS allows you to throw around 10 pounds over your raw 1RM for sets of 5 or 6 like it’s nothing. Sound good? Yeah, I thought so.

So, unless you’re Paul Sousa and foreverslangerless, you probably already have one, or have it on order by now. However, the most oft-asked question after someone gets their SS is “AWESOME!….now what do I do with it?” Interestingly enough, there’s really not much out there on how to formally incorporate it into your training. Here are a few suggestions on how I would include it, based on my experiences the past year and a half.

As a quick note, always use a lift-off, a spotter, a thumbs-around grip, and wrist wraps with your SlingShot. If you don’t, you’ll die. Don’t die. Thanks.

Texas Method (TM): This is the base of most programs I coach. TM for bench typically consists of a Volume Day and an Intensity Day each week, followed by accessory work. Volume Day (typically Monday, aka National Bench Day) will often consist of an Over-Warmup (OWU), followed by 3×5 at an RPE of about 8, followed by tricep and bicep brobuilding work. (Do twice as much tri work as you do bi work, by the way. It is known.) I usually save the SS for Intensity Day (ID), since the OWU adds some heavy work on Monday. On ID (usually Fridays), after the final intensity set, I will have a lifter keep the same weight on the bar, but add the SS, and do their first “warmup” set of about 3-5 easy reps to get used to the SS groove. After that, I’ll add 20-30 pounds and prescribe two sets of max reps. This is usually around 6-10 reps per set, with about 2 minutes of rest between sets. This provides a good amount of extra tricep hypertrophy work and a lot of extra full-ROM volume performed at a very heavy weight for a lifter that might only be used to handling that weight for 1-3 reps. I’ll have a lifter do this for 4-8 weeks to get used to the effect and groove of the Slingshot. Like anything else, there’s a bit of a learning curve, but within a workout or two, you should be pretty efficient. The slanger is really easy to use.

After the lifter has gotten comfortable with the SS, and their structures are used to handling heavy-ass weights, I kick it up a notch. I typically alternate SS work between what I’ve described above (rep work) and what I call “heavy work.” This usually means working up to a 2-5RM PR attempt, with a heavy 1RM attempt every couple months or so just for funsies.

Example:

Intensity Day, Week 1 (reps):

Raw: 275×5 (P-R)

Slingshot: 275×5, 295×8,9

Intensity Day, Week 2 (heavy):

Raw: 280×5 (new P-ARGHHH)

Slingshot: 280×5, 295×5, 305×5, 315×5

I suggest taking several steps up to a new PR set – it usually ends up at around 3 work sets with the slanger. Stay conservative at first, and don’t get greedy – there’s no reason to fail a SS set for quite awhile. Eventually, you can start reaching a little further, and as you do that, your comfort zone will extend, and you’ll make bigger gains. But don’t go for broke right off the bat, or you’ll fuck something up. Like, in a bad way. Don’t do that.

Linear Progression: 90% of you kids doing a linear progression are doing it wrong. If you’re one of them, you’ll figure this out after a couple years, and we’ll have a good laugh. Don’t worry, it’s not the end of the world. And neither is adding in some overload every once in awhile. If someone is doing a 3×5/3×5+/4×6+/whatever bench linear progression, I’ll have them add the SS every third session for a couple sets of heavier work after their work sets (as described in the TM example above), but nothing crazy, and preferably with an extra day of rest afterwards.

A novice doesn’t need to perform a 1RM SS effort to make progress, nor should they be attempting one if their goal is long-term strength gains, as opposed to ego-pumping and high-fiving. The SlingShot can be an effective tool to help keep things from getting stagnant, or it can be a distraction that keeps you from making steady progress. It’s up to you to make it the former, not the latter.

Equipped Lifters: The SS is not a substitute for a bench shirt. It’s going to have a vastly different groove and feel than the shirt you’ll wear in a meet. It’s a great way to build tricep strength specific to the bench movement, and it’s going to work well to make you feel more confident in simply holding heavier weights. However, it is NOT going to fix any technical problems you have when benching with your shirt! Don’t substitute one for the other. Use the SS to get stronger and use the shirt to get technically proficient with your shirt. Add in heavy sets regularly, working up to the 2-3RM range (with a pause) towards a meet, using several ascending sets.

Westside: If you don’t have personal access to Louie Simmons, or train under a coach who has trained under Louie for a good amount of time, you simply aren’t “doing Westside.” Sorry, bro. And if you do happen to be training under such a coach, he likely has his own ideas on how to incorporate a SS into your training, so listen to him, not some idiot on the internet. With that being said, If I had a lifter who, for some reason or another, absolutely had to have a conjugate-based “Westside” training style, here’s how I would do it. I’d incorporate the SS into Max Effort rotation (basically taking the place of a reverse-band bench), along with Floor Press, 2-3 Board Press (depending on arm length), and with plain old Bench Press. I’d sometimes throw it in as accessory work for the tris, in the 3-5×6-12 range (think close-grip, maybe to a 1-2 board if that keeps your shoulders happier, sometimes with the Swiss/Football Bar). At least a couple times a year, I’d throw it on for a 3 week DE cycle, at an appropriately heavier than normal weight (about 20-25% over normal straight weight, maybe adding light chains/bands, but probably not).

5/3/1 and most other programs: Rotate the SS in the same as you would other tricep-building exercises, like Close-Grip Bench, Dips, and Skull Crushers. All of these are excellent and should be incorporated regularly – but they’re still considered accessory work, and need to be considered as such. Assuming the goal of your assistance work is tricep hypertrophy, 3 or so sets of 8-12 reps is going to be your money-maker. Throwing in some rest-pause sets every once in awhile will keep you uncomfortably swoll.

Injuries: The SS is great for lifters with AC joint issues. Stan Efferding and KK have famously advocated it for this purpose, and they both bench roughly a hundred times as much as you. The reason for this is simple: It allows you to be better about keeping your elbows tucked closer to your ribs (IE, external rotation of the AC joint). Now, you still have to make a concerted effort to keep from flaring your elbows, but wearing the SS will absolutely help in that regard. For lifters (such as myself) that have had AC injuries, surgeries, or whatever, this is huge. It means you can keep benching (heavy) without experiencing pain. Sweet. Keep the reps pretty, and do a lot of paused work. “Pretty reps” means that if you can hit an ugly 225×12 raw, you can hit a beautiful set of 225×16 with the SS.

An injured lifter can also use the SS on their “volume” days (or RE, or whatever terminology you want to use), but you have to be careful about introducing it slowly and ramping it up over time, so as not to hit a wall at 90mph.


For those of you who already haven’t ordered one, you might ask – What color should I get?

Blue: The Reactive. Best for light-weight benchers (<250lbs) and injury-rehab, or for using for things like high-rep push-ups. Will add about 10-15% to your bench, and has a very nice bounce to it without being difficult to control. The material is the nicest “feeling,” if you care about such things, and the blue matches my eyes pretty well.

Red: The Original. This is the most popular slanger, and typically considered the best all-around. Some people prefer the blue for all raw lifters, but I’m not one of them. The red adds about 20-25% to your bench, which is a fucking lot of percents. A 300lb bencher will be able to hit 365 with a red SS and some practice. A 365 bencher will easily hit 4 plates for the first time, and as a result, will feel like a porn star. You’re welcome.

Black: The MadDog. I haven’t used one of these yet, but I’m pining for one real bad. This should easily add 30% to your bench, but will make touching light weights very difficult. It will also have a more difficult learning curve. It will probably inflate your ego twice as much as a red. If you don’t bench 4 plates, this probably isn’t the right SS for you, but it could be a fun toy to play with on occasion. Plus black is the best color – it’s like, all the colors in one. Science.

Sizing: Get a looser one to make it easier to use (less drama), or a smaller one for bigger weights. My XXL takes about .18 seconds to slide on my teeny-tiny 17″ arms. A smaller size would certainly give me more carryover, at the expense of being slightly less convenient to use.


If you have any questions, ask away. And if you order one, tell ’em I sent you. Maybe I can get free shipping on that new MadDog I’ve been wanting.