
Here’s the third installment of “AC teaches you how to do stuff more awesomely.” So far, he has gone over some tips on how to press better and how to bench better. Today, he goes over how to coach the squat.
There are two basic variations of the back squat: High Bar and Low Bar. They’re two different squats, but there are semi-similar ways to go about learning/doing/coaching them.
I want to help you teach the squat in general. First and foremost, you are going to to have the athlete stand in front of you like a mirror. Next, you are going to tell them to place their feet shoulder width apart. Just like the grip on the bench, this stance will provide the longest ROM with the most musculature utilized in the lift. It’s similar to the bench in that it’s harder to put your femurs into external rotation the wider you go (shoving your knees out). Next, their toes are going to be slightly pointed out. This will allow the athlete to shove their knees out to perform full ROM and get external rotation more than if their toes were pointed straight. 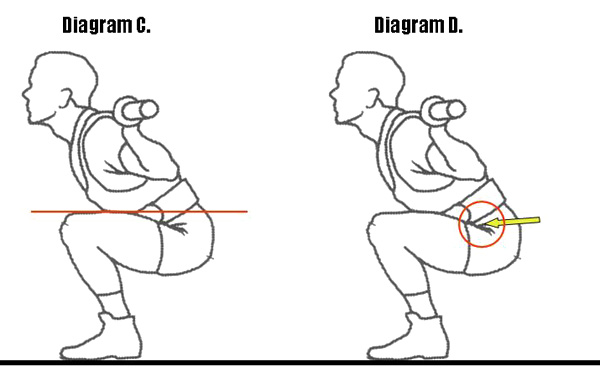 If the toes are straight (most athletes don’t have the mobility to accomplish toes straight and knees out) and the athletes knees are forward instead of out all that muscle and bone and fleshy area of the hip/femur mash into one another making it harder to achieve depth. With that said, have the athlete squat down to depth and stay down there. Note: this is without the bar. Have the athlete take his hands, put his palms together and with his elbows, shove the knees out. All of this is being down while maintaining extension in both lumbar/thoracic spine (WE ARE STILL AT THE BOTTOM OF THE SQUAT).
Now this leads into the low-bar squat. Low bar uses a little more hamstring than a high bar, but if your athletes are doing a lot of cleans (full cleans) then the high bar may be of more use to you because the squat in the clean is similar to a high bar squat.
In case I lost your attention…

From there you are going to walk around behind the athlete and place your hands on their low back/hips and apply slight pressure. The weight should be placed right over the middle of the foot, roughly where you tie your shoe laces. THIS IS WHERE ALL THE WEIGHT IS ON A LOW BAR. You are then going to tell them to “DRIVE” their hips into your hands. This emphasizes “Hip Drive,” which is what low bar squatters use to rebound out of the hole.
Notice my hips driving me out of the bottom. Also notice how I maintain my bar position because my spine is in extension. Have them do this once or twice to get a feel for it. Another thing to note here: Their head position is neutral with their eyes fixed on a reference point a few feet in front of them. They ARE NOT LOOKING UP. Looking up destroys the tension that you attained through eccentric contraction in the hamstrings. The hips and knees move forward losing that stretch reflex. You can demonstrate this by doing a 3rd and 4th rep with the athlete in this demo phase. Have the athlete look at the ground a few feet in front of them and then command them to drive up (hands still on the hips), then have the athlete look up as hard as they can (like most coaches tell them too). Squatting should be significantly harder now. Keep in mind this is for the low-bar. You can get away with that more in the high-bar, but it’s not a good spinal position.
Now you can take them to the barbell. Start with just the bar and then move from there. For the low bar, the barbell sits along the spine of the scapula. It’s almost like a ridge that your body creates when you place yourself under the bar. When the athlete is under the bar, move so you can be in a position next to them. From there you are going to give them the last little touch up cues. When they unrack the bar it should coincide with a large breath of air and extension of the spine. Reference my video if you need to look again. Also, when they unrack it their elbows should be applying downward pressure on the bar. Do not let their elbows slack down. All the weight of the bar is on their back NOT on their arms. Again, notice in the video how my elbows stay high. They are going to take roughly two steps back and take the same stance they had when you were teaching them before. Now right before they go, you will tell them 2 last things: A: They are going to have to shove their knees out without their elbows, and B: They are going to REBOUND out of the bottom, so basically they aren’t pausing at the bottom.
Notes:
Take a big breath and hold it for each rep. Each rep gets a new breath and it gets held FOR THE WHOLE REP.
At all times their eyes should be fixated on a reference point. It is hard to maintain balance if they are looking around.
Cues for Low Bar Squats:
“Knees out.” The athlete shoves their knees out for external rotation. Easier ROM, more musculature in the lift.
“Mid-Foot.” If you see the athlete shifting their weight, it can change the mechanics of the squat. This cues them to put their weight back on the middle of the foot.
“Drive.” This will remind the athlete to use his/her hips when they rebound out of the hole.
“Bounce.” This is tough for some people to get, but they essentially have to rebound out of the hole off of their hamstrings, using that eccentric contraction we talked about earlier. This is more of an advanced cue – for beginners, think “control down, fast up.”
Moving on to High-Bar Squats
The High Bar is similar in a few ways, but the bar placement is placed (higher) on the traps. This bar placement changes a few things. The torso has to maintain a more vertical position throughout the lift. The more vertical the torso, the more acute (closed) the knee angle will be. The “knees out” cue stays the same – it’s crucial for both styles of squats. The cue that changes here is “Mid-Foot.” The weight is emphasized on the heel, NOT the mid-foot. Put emphasis on “heels” on the way down and up. “Knees out” is just as important — common for lifters to bring them in at the bottom and on the way up in the high bar variation.
For more discussion on Low Bar and High Bar squats, see Justin’s article on the subject. Remember, neither of these articles is telling you exactly which is better for your situation, or demonizing either variation. If you’re confused, discuss the subject with your fellow lifters, your coach, and contemplate the issue quietly in the godswoods. Or, you know, try ’em both, and shit. If you can’t hit 4 or 5 plates with both variations, you should probably just do more of them. – Jacob